Last January I was ogling my co-worker’s lunchboxes as they enjoyed citrus, bananas, and vegetables from places I could only dream about living. Gone were the red ripe watermelons and fresh salads that made local eating easy in June, July and August. Just after the New Year, we had to start rationing our 10 remaining bags of frozen broccoli, what we thought was enough to last us through a Minnesota winter. Last January I was completely unprepared for the wintertime locavore life.
This year, things are much different here. The canning went well, the freezer has enough broccoli, green beans, and corn to sidestep rationing...at least until April. And a small area of our townhome basement has been transformed into a make-shift root cellar, filled with squash, onions, apples, and root vegetables.
Root cellars have been a mainstay in Midwestern farm houses since the beginning of “Midwestern.” I can remember crawling into the dark space in my grandparents’ basement for the best hide-and-seek spot, or threatening to lock my sister in my parents’ root cellar as a kid. With memories of dark, cold, and the musty smell of preservation, I never dreamed of storing root vegetables in my hip urban home. That was until last January.
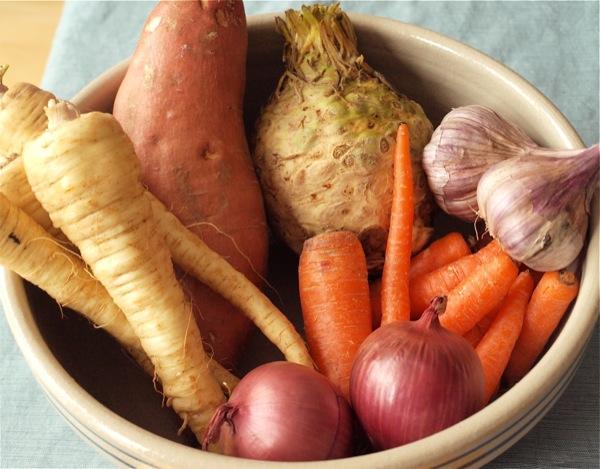
This summer I researched root cellars and discovered most homes—urban or not—have at least one available spot for winter stockpiling. Just as my childhood memories go, most root vegetables need cool, dark, and moist spaces. Squash, pumpkins, and apples like the dark and cool, but prefer things a little more dry. Together, they add up to three or four additional months of local food each year.
Here’s how to find your root cellar spot:
- Decide which crops you plan to store. Apples give off a gas when stored that turns other vegetables bitter. Carrots, turnips, and beets need a moisture source. Potatoes and onions should be warmer and avoid as much light as possible. The University of Missouri Extension office has a list of each vegetable’s ideal living quarters.
- Find the coldest spot in your home that doesn’t deep freeze. This could be a basement floor, a windowsill that could be shaded, a covered area of a patio, a closet that could be closed off from heat.
- For carrots, turnips, parsnips and other root veggies, line a cardboard box with newspaper and a layer of clean sand or sawdust. Add a layer of veggies, another layer of newspaper and some more sand. Continue layering until box is full. Put the largest veggies on the bottom (they keep the longest) and eat your way through the smaller ones.
- In our lessons from Whistling Well Farm we learned that onions and apples should be wrapped individually in newspaper and stored out of the sunlight in a covered box. Apples prefer a little moisture, but be sure to keep onions nice and dry.
- Our squash are simply laid out on a flattened piece of cardboard on our unfinished basement floor. We purchased them in early October and so far have lost only one from spoilage.
Last January, I was caught napping on the winter preparations. This year has been a welcomed change. Instead of ogling my co-worker’s lunchboxes, I’ve been showing off my winter veggie dishes to some envious onlookers. Root veggie cakes served with local sour cream has been the January star this year. If you’ve got a cellar stocked full of root vegetables, or happened to find a few at the winter farmers’ markets, this recipe makes an easy winter main course or a perfect side to beef or chicken.

Root Veggie Cakes
6 cups peeled and shredded root vegetables (use whatever varieties you have on hand: carrots, parsnips, potatoes, turnips, sweet potatoes, all work well)
1 small onion, finely chopped
2 Tbsp. flour
1 egg, beaten
½ tsp. dried parsley
2 Tbsp. cooking oil
sour cream for dipping
Combine root vegetables and an onion in a large bowl. Add flour and toss to evenly coat. Add in egg and seasonings and mix until combined.
Heat cooking oil on a non-stick skillet. While oil is heating, divide vegetable mix into 8 portions and patty out until about ½” thick.
Place patties in pan and cook 4-5 minutes on each side, or until golden brown. Serve immediately, dipped in sour cream.
 Amy Sippl is a new contributor to Simple, Good, and Tasty. She grew up in rural Wisconsin, but now calls St. Paul her home. She writes about her successes and struggles to eat and grow local food on her blog: Minnesota Locavore. Her last article for us was Cranberry apple jam and the last of the canning season.


