This is the second post in a series about do-it-yourself craft cocktails. Also check out the first post in the series on making your own simple syrups.
An aspect of DIY food culture that I absolutely love is the insistence that every element of what we make and share can be improved. More and more elements of our meals are made almost 100 percent from scratch. Not too long ago, it would have been impressive to have friends over for, say, a lasagna dinner. Maybe you would have made the sauce and bought the noodles and served the lasagna with a good bottle of wine. Now, if you follow the DIY aesthetic, you’re making the noodles and the ricotta yourself, and also growing the spinach. You’re getting pork from a local farm and grinding it into sausage yourself. Not to mention growing the tomatoes, canning them, and relishing the evening you get to pop the lid to simmer it down for friends. (Caveat: I myself haven't made this exact meal, but you get the idea.)
 But when you’re
putting all that effort into every aspect of the food you serve, don’t forget
that drinks can also play an important role in the meal. Drinks, too, are
becoming more thoughtfully composed - and, most importantly, more delicious.
The end result is that the experience of entertaining becomes more festive. Devoting yourself to DIY drinks isn't about
showing off either how obsessive you can be or the amount of free time you have
to devote to such hobbies. Instead, it's about wanting to make both food and
drink as interesting and satisfying as possible. It's also about paying attention to the
details that make an evening special: making several elements of the meal and
drinks yourself is an implicit way to tell your guests that you're happy to be
in their company, and that the time you've designated to be with them is
something special to you.
But when you’re
putting all that effort into every aspect of the food you serve, don’t forget
that drinks can also play an important role in the meal. Drinks, too, are
becoming more thoughtfully composed - and, most importantly, more delicious.
The end result is that the experience of entertaining becomes more festive. Devoting yourself to DIY drinks isn't about
showing off either how obsessive you can be or the amount of free time you have
to devote to such hobbies. Instead, it's about wanting to make both food and
drink as interesting and satisfying as possible. It's also about paying attention to the
details that make an evening special: making several elements of the meal and
drinks yourself is an implicit way to tell your guests that you're happy to be
in their company, and that the time you've designated to be with them is
something special to you.
To me, a cocktail doesn't feel right if it doesn't have a garnish. Having one floating in the glass or hanging from the rim creates a before and an after (“have I had the snack portion of this beverage yet?”), and thus a more interactive drinking experience. Garnishes seem like an easy afterthought, but adding an element that is sickly sweet, uninteresting, or made in a factory at some unspecified time in the recent past can really bring down the overall quality of a well-made drink.
Making your own garnishes is simple and inexpensive -- not something you need to spend a lot of time on. Now that it's autumn and we are migrating back into the kitchen to roast, braise, and stew, it's an easy task to set one more pot on the stove and throw together a batch of candied lemon peels to be used in drinks later in the week, or to put together a jar of pickled Brussels sprouts to add to bloody marys on Sunday.
Here are some easy recipes for garnishes, all of them hands-off enough that you can make them while in the kitchen cooking other foods. The recipes are adjustable to personal taste, and the results can be used in several types of cocktails. As always, drink responsibly.
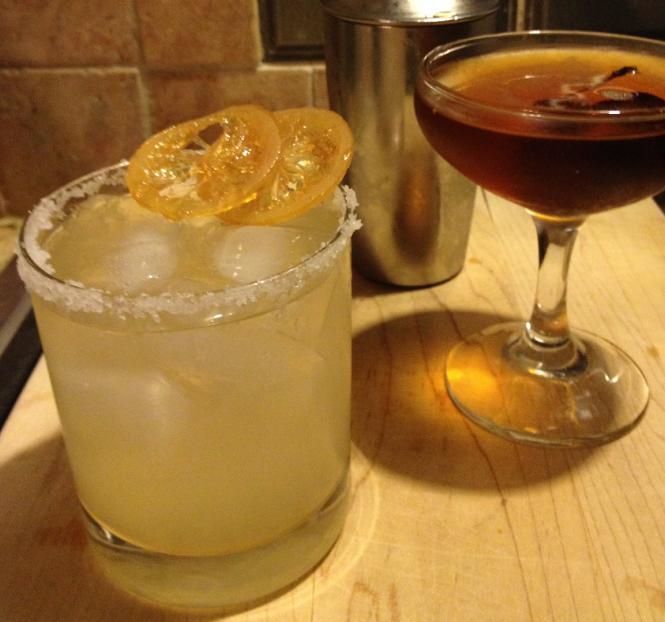
 Candied Lemon Peels
(for use in sidecars, margaritas, and martinis – one or two slices per drink)
This is essentially a recipe for making candy – candy for your drink. These pair well with cocktails that are already fairly sweet, and offer an undercurrent of spice that might not normally be associated with a sidecar or margarita. They can also be used in martinis, for those that prefer a lemon twist to the savory options (olives, vegetables, etc.).
Ingredients:
2 lemons
1 1/2 cups granulated sugar
1 1/2 cups water, plus more for boiling
2 star anise (alternately: 1/2 stick of cinnamon or 6 whole cloves)
Instructions:
1. Carefully and thinly slice the lemons, using a sharp chef's knife or mandolin.
2. Fill a pot with 2-3 cups of water and put on the stove over high heat.
3. When the water is boiling, carefully add the lemon slices. Boil them for ten minutes then drain.
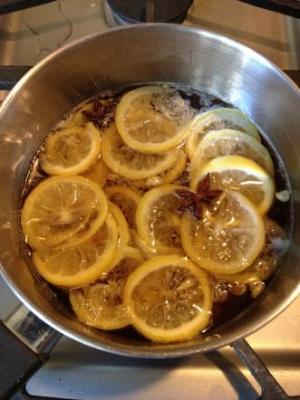
4. Fill the pot with sugar and water and turn heat to medium. Add the anise (or cinnamon or cloves.)
5. When the syrup begins to bubble, add the lemon slices. Turn the heat to low and gently simmer the lemon slices for 45 minutes.
6. Turn off the heat and cool for 10-15 minutes.
7. Line a baking sheet with parchment paper and place a cooling rack over it. Carefully remove the lemon slices with a fork and lay them on the cooling rack.
8. Allow the slices to dry overnight.
9. Store the slices in an airtight container, with layers of parchment paper separating them. (They will be sticky.)
The slices will keep in the refrigerator for several days. Note: the spiced lemon syrup can be reserved and used for mixing into other cocktails.
 Goat Cheese Stuffed
Tomatoes
Goat Cheese Stuffed
Tomatoes
(for use in martinis and bloody marys – one or two tomatoes per drink)
I don't like olives. It's silly to even discuss such a minor detail, but some friends have laughed in my face when I tell them, then ask me “What's your problem?” in complete seriousness. And though I understand that olives are luxurious and salty and thus (theoretically) the perfect bar snack, I can't endorse the way they dominate one's palate – too much brine, too much cloying aftertaste. So I offer this alternative: goat cheese stuffed cherry tomatoes. They're the right size, they offer a similar amount of salt and chew, but their flavor is much brighter and cleaner than olives.
Ingredients:
6 cherry tomatoes
6 teaspoons chilled goat cheese
3 basil leaves (optional)
toothpicks
Instructions:
1. Slice the tomatoes in half along the equator (this will make them easier to reassemble with toothpicks.)
2. Remove the seeds by lightly pinching both halves and flicking them into the sink/compost tray/garbage.
3. Take a teaspoon of goat cheese and fill one half of a tomato. Press the filled half lightly to the other half of the tomato and hold them together with a toothpick. (If using basil, tear one leaf in half and press between the two sliced tomato halves.) Be careful to fully “close” the tomato to make sure the martini remains clear of debris.
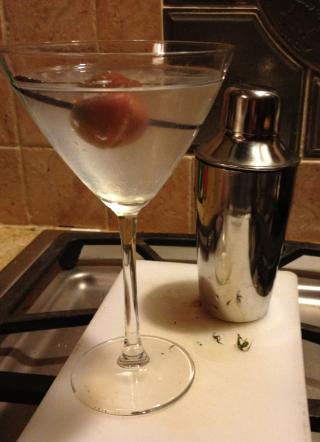
 Rum Cherries
(for use in manhattans and old fashioneds – one or two cherries per drink)
Maraschino cherries are not only overly sweet, but also clash with the mineral smokiness of a well-mixed whiskey drink. Making a homemade batch of cherries with rum (a contrasting but complementary liquor) is a way to mitigate the cherries' sugar levels and turn them into a garnish that pairs better with the drinks themselves.
Ingredients:
1 pound cherries, pitted
1/3 cup raw/turbinado sugar
1/2 cup of water
1 cup dark rum
1 pinch salt
1/2 teaspoon Chinese Five-spice powder
1/4 teaspoon grated lemon zest
4 dashes bitters
1 quart canning jar
Instructions:
1. Combine the water, sugar, salt, Chinese Five-spice powder, and zest in a medium-sized pot. Turn the heat to medium and stir until the sugar is dissolved.
2. Turn heat off and add the rum and bitters. Stir to combine.
3. Put cherries in canning jar.
4. Allow the syrup to cool on the stove for 10 minutes before pouring over the cherries.
5. Allow the cherry mixture to cool to room temperature. Top off with additional rum if needed to cover the cherries.
6. Close the lid, shake the jar, and place in the refrigerator.
The cherries are ready to use in 24 hours and should keep in the refrigerator for 1-2 weeks. Their liquid can be used to flavor cocktails (for example, mix a teaspoon or so into manhattans, or two teaspoons into whiskey sours).
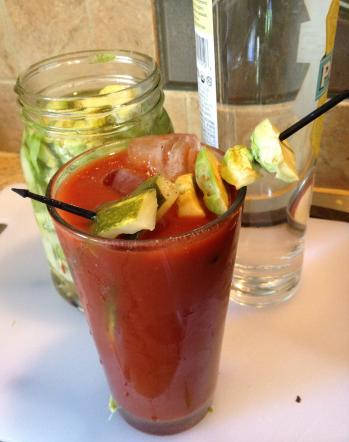
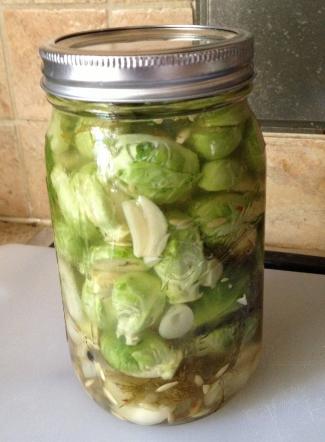 “Quick” Pickled Brussels
Sprouts
“Quick” Pickled Brussels
Sprouts
(for use in bloody marys and martinis – two or three sprouts per drink)
The following is a general recipe for refrigerator pickles and can be altered according to taste. An optional step is to blanch the sprouts in boiling water for three minutes between steps 1 and 2. (This will lessen their sharp, “cabbage” flavor.)
Note: These quick pickles are different from traditional “canning” pickles, and should be kept refrigerated and consumed within 1-2 weeks.
Ingredients:
1 pound brussels sprouts
1 cup water
1 cup cider vinegar
1 tablespoon salt
3 tablespoons fresh dill, chopped
15 black peppercorns
3 cloves garlic, sliced
1 pinch red pepper flakes
1 medium onion sliced into rounds
1 bay leaf
1 quart canning jar
Instructions:
1. Trim the sprouts and rinse in cold water. Slice them in half, being careful to preserve the “bottom” of each sprout (otherwise the leaves will fall apart.)
2. Heat the water, vinegar, and salt in a medium saucepan. When it comes to a boil, turn the heat off.
3. Put the sprouts, dill, peppercorns, garlic, pepper flakes, onion, and bay leaf into the jar. Pour the brining liquid over them.
4. Allow to cool in the jar before closing the lid. Shake the jar a few times and place in refrigerator.
The pickled sprouts will be ready to eat in 2-3 days, and should keep in the refrigerator for 1-2 weeks. Be sure to shake the jar at least once a day to make sure all the sprouts are brining.

Peter
Groynom is a graduate of Carleton College and the San Francisco School
of Bartending. He is an avid home cook, a writer, and a Photoshop
enthusiast. His photography can be found at Arts and Hovercrafts. He lives in Minneapolis. His last post for SGT was DIY Craft Cocktails: Make Your Own Simple Syrup.


