In our household, the autumn ritual of preserving our garden through canning, freezing, and juicing is a family gathering in the kitchen. I love the opportunity to fend off those first few cold nights with a steaming hot kitchen, the house windows fogged up from all the blanching, poaching, and hot water baths. We play jazz music on the stereo, and even after the kids go to bed, I’m often putting up the last few jars until 2 am. It’s one of my favorite parts of the year. There is only one exception to the rule here, the evening where my wife and kids can’t get far enough away from the house while I’m working. Despite that fact, this remains one of my favorite nights of all…processing hot peppers.
The last three years, we’ve been growing both jalapeños and Thai chilies, both of which have produced plants so full of fruit that they’re often weighed down with red peppers by the end of the season. We eat a fair amount throughout the summer in salsas and soups or with breakfasts and taco nights, and we’ve been getting more creative with their uses (for example, this Fresh Thai Chili and Tomato Bloody Mary, which uses a Thai chili-infused vodka) but at the end of the season, when we come in from the garden with bowls full of spicy ripe goodness, it’s time to make hot sauce and chili paste.
My first attempt at a Thai chili paste was successful but dauntingly time consuming. I couldn’t wait for the red peppers of August and September, so I decided to make a mild green chili paste to add to seafood curries, Indian dal, and fried rice dishes. The result was a paste with an amazingly complex flavor that had the final say in each dish I used it in. There was very little heat in the paste, so I was free to use it liberally around our young children (who prefer milder foods) as well as some of our locally-raised friends with lower spice tolerance. (At a breakfast restaurant I once cooked at I was reminded that ketchup is the Norwegian salsa.)
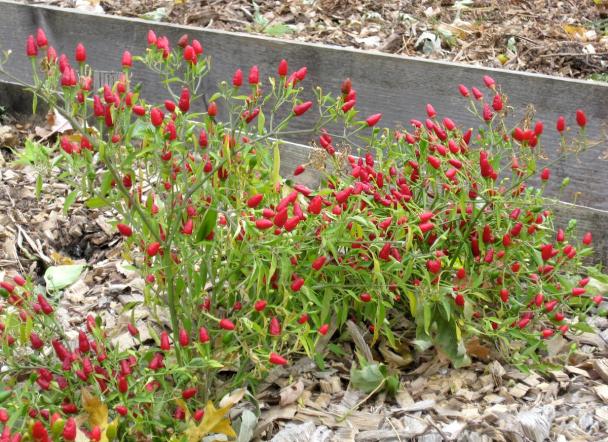
 Chili plants
For that recipe, I decided to seed all of the green chilies, which was almost always recommended in my research of Thai chili paste recipes. Now, I don’t know what kind of Thai chilies most people grow (or buy) but I get the idea that they are quite a lot larger than the variety that we grow. Ours are about ½ inch long and just a few millimeters wide, whereas most descriptions of Thai chilies I’ve seen are more like 1-2” long and ¼-½” wide. Those would have been a lot easier to seed, but I’m not one to back away from a challenge. I took about 100 green Thai chilies and, over the course of an hour or two, I painstakingly sliced them all open and deseeded them. I did most of the work (beside the slicing) in a large bowl of water with the idea that the seeds would sink and separate easier that way, which did work very well. I then processed the peppers very similarly to the recipe for red Thai chili paste below.
But with nearly four times that many peppers at the end of the season, there was no way I was going to attempt to seed them all, so I decided to process them seeds and all. What I got was an amazing red Thai chili paste that satisfies the flavor profile I was hungry for as well as the fiery heat of southeast Asian cuisine. Not only that, the whole process took almost no time at all. I ended up freezing three half pint jars and keeping one in the refrigerator. This recipe is not for the mild of tongue, however. I’d recommend starting with 1 teaspoon of red chili paste per recipe (serving 4-6 entrees) for a fairly spicy meal. My first use was in a chicken and potato curry, and I used 2 teaspoons, which was exactly how I prefer it to taste – with a good burning aftertaste but without any sweating or hiccups.
Also, don’t forget that these are raw chili pastes and they benefit from a good 2 minute sauté in oil at the start of the recipe to open up the flavor that roasted chilies can bring to your food. If you are sautéing meat or vegetables for your dish, you can add the chili paste during the last 2-5 minutes before adding the coconut milk or other liquid. This will make your kitchen (or if you live in a small house like ours, the whole house) very spicy, so warn the others in the house ‘cause there’s going to be some coughing going on. But don’t worry – the spice will mellow as you finish out the recipe.
The following is the recipe that I used for both the aforementioned Thai chili pastes. The pepper size in the recipe is for the larger (I think more common) sized Thai chilies, while with my smaller sized peppers I probably used about 200 chilies

Thai Chili Paste
This paste lasts very well in a glass jar for months. Alternatively you can freeze chili paste in tablespoon sized servings or larger containers. I used to freeze my pesto in ice cube trays (approx. 2 tablespoons per cube) and then break them out into a gallon size freezer bag for individual use, which I think would work well for a milder chili paste such as the green.
Ingredients:
- 20 Thai chili peppers (seeded, if you want a mild paste)
- 1 stalk lemongrass, chopped
- 2 shallots, sliced thin
- 4 cloves garlic
- 1 Tbsp. ginger
- ½ tsp. coriander, ground
- ½ tsp. caraway seeds, ground
- 1 Tbsp. fish sauce
- 4 Tbsp. canola or soy oil
Instructions:
- Combine all ingredients in a food processor and blend until very smooth.
After the Thai chilies were processed, I dealt with our jalapeños. Normally I’d go with the default plan and can several jars of garden salsa, but a drought left us with a poor late-summer tomato yield. I didn’t have enough tomatoes to make salsa, and rather than supplementing with farmer’s market tomatoes I decided to make a homemade hot sauce. Green jalapeño sauces have always been very popular in southern, southwestern, and South American cuisine, which are all foods that I love, but all of my jalapeños had turned red. So I figured, why not make a similar sauce out of red jalapeño?
Oddly enough, in my research for a recipe, the one that I settled on was another Thai inspiration called Prig Nam Som. I chose it because of its simplicity, with the idea that I really wanted the fresh garden pepper flavor to be the star of the sauce. Again, although many of the Prig Nam Som recipes called for seeded and often roasted peppers, I decided to leave the heat in and keep the peppers raw. This made the sauce’s preparation incredibly easy.
Prig Nam Som
Make sure to wear gloves; also, the processing of peppers in the kitchen made the air rather difficult to breathe, so open a window if you can.
Ingredients:
- 8 jalapeno peppers
- 1 tsp. salt
- 2 cloves minced garlic
- ½ c. vinegar (or enough to cover)
Instructions:
- Process the peppers in a food processor until roughly ground, then mix with the salt, garlic, and vinegar. Keep in glass containers and let the sauce age1-2 weeks in the refrigerator before using.
The Prig Nam Som really jumps culinary boarders for me, tasting great in both Asian as well as American and Latin American cooking. We’ve been using it in place of Tabasco sauce, and I also prefer it to the ever-popular Sriracha sauce (Rooster sauce) because of its omission of sugar.
The following are a few ideas for recipes we’ve used at home with our Thai chili paste. Hopefully some of these recipes will bring some heat to your autumn nights.
Leave a comment if you have other suggestions!
Roasted Coconut Chicken
Ingredients:
- 1 chicken, quartered with breasts split
- 1 Tbsp. oil
- 1 can coconut milk
- 2 Tbsp. tamari or soy sauce
- 1 Tbsp. fish sauce
- 1 Tbsp. green Thai chili paste (or substitute 1-2 t. red Thai chili paste)
- 2 Tbsp. brown sugar
Instructions:
- Marinate all together overnight. Brown chicken in a large cast iron or paella pan. Add marinade and bake at 350-degrees for 1 hour.
- Add any of the following to the pan when placing the chicken into the oven: pineapple, mushrooms, carrots, beets, cherry tomatoes, potatoes.
- Serve with rice.
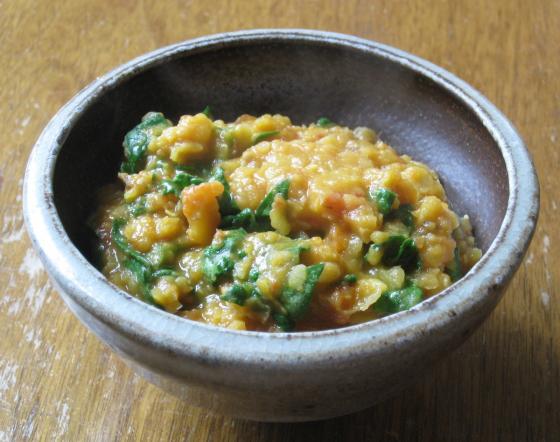
 Moong dal
Creamy Moong Dal with Spinach
Ingredients:
- 1 c. moong dal (or yellow split peas)
- 5 c. water
- ½ onion, finely chopped
- 1 Tbsp. oil
- 1 Tbsp. green Thai chili paste (or substitute 1-2 t. red Thai chili paste)
- 1 c. crushed tomato
- 2 Tbsp. butter
- ½ tsp. cumin seed
- ½ tsp. mustard seed
- 8 oz spinach, thin sliced
- 1 tsp. salt
Instructions:
- Saute onion in oil until golden, then add chili paste for 2 minutes. Add water, dal, and tomato and simmer, covered, for about 2 hours until dal is smooth.
- Melt butter on med/low and add cumin and mustard seed. Simmer until seeds begin to pop, then quickly add to the dal.
- Stir in spinach and salt.
Spicy Beef Curry
Ingredients:
- 8 oz steak, thin sliced
- 1 onion, thin sliced
- 1 potato, diced small
- 1 carrot, thin sliced
- 1 stalk celery, thick sliced
- 1 can bamboo shoots
- 1 can coconut milk
- 1-2 tsp. red Thai chili paste
- 2 Tbsp. tamari or soy sauce
- 1 Tbsp. fish sauce
- 1 Tbsp. brown sugar
Instructions:
- Saute onion in 2 T. canola oil until soft. Make a well in the middle of the onions and fry the chili paste in oil for about 2 minutes.
- Add the remaining ingredients and simmer until the potato is soft (approx. 15-20 min.)
- Serve over rice.
Red Mushroom Curry with Shrimps
If you don’t like shrimp, substitute with more mushrooms…if you don’t like mushrooms, substitute with more shrimp.
Ingredients:
- 1 onion, sliced thin
- 2 tsp. red Thai chili paste
- 1 clove garlic, minced
- 1 inch ginger, minced
- 2 cans coconut milk
- 1 bunch kale, sliced thin
- ¼ c. fresh basil, sliced thin
- ¾ lb. shrimp
- ¾ lb. halved crimini mushrooms (baby portabella)
- 2 Tbsp. brown sugar
- 1 lime, juiced
- ¼ c. tamari or soy sauce
- ¼ c. crushed peanuts
Instructions:
- Saute onion in 2 T. oil until soft. Add curry paste, ginger, and garlic for 2 minutes.
- Add coconut milk, kale, basil, mushroom, and sugar. Simmer until mushrooms are tender.
- Add shrimp, lime juice, tamari and peanuts. Simmer until shrimp are pink (2-4 minutes) and serve over rice.

Benjamin Krikava lives in north Minneapolis with his family. After over a decade of restaurant work he has moved on to be employed in the medical field, now helping to prevent heart attacks rather than cause them. When he's not at work or on his bicycle you will find him in the kitchen drinking the rest of the bottle of wine that the recipe didn't call for. His last article for us was: Crio Brü: Cocoa That You Brew Just Like Coffee.

