Every spring I imagine my ideal garden: weed free, self-tilling, self-watering, disease-resistant, a garden safe from hungry, pesky bugs and critters. Every spring for the past seven years I set out to my little strip of trucked-in topsoil behind the garage of our Lanesboro farm house, determined to coax the ideal garden out of the ground this time, at last! And every midsummer about the time a good dry spell sets in, I am humbled by the many troubles that have cropped up in my perfect little garden. The weeds have somehow managed to out-strip everything – many as tall as I am (granted, I’m short). Still, it’s sobering to realize how entirely I’ve lost my focus on weeding and watering, how compacted the soil has become, how cabbage moths and tomato blight have taken a harsh toll.
Its possible I'm the worst gardener in all of Fillmore County. Having spent the past few years as an advocate for local foods in Lanesboro, my gardening skills – or lack thereof – are an embarrassment. Though I’m passionate about the need for communities to grow more local foods and to patronize local growers and producers who go to great lengths to grow with intention and integrity, I’m still searching for a gardening method that can flourish in spite of my great bursts of enthusiasm and long periods of neglect.
Over the seasons my gardening skills have improved just slightly, thanks in part to The Ruth Stout No-Work Garden Book. It provides a helpful way of thinking about gardening primarily posing mulch as the solution to weeds, moisture and fertility. But I marginalized the rewards of the Stout method by substituting a “mulch” of repurposed conveyor belt material that absorbs heat, smothers weeds and holds moisture. By mid-July the strip of garden, which is sheltered by deep eaves and rain gutters, resembles a desert. My great intentions to drag out hoses wilted along with my garden plants. I even canted the conveyor belt material to create rain-catching planting trenches, which helped, but the microbial life of the soil was compromised and the out-of-sight garden was only top-of-mind when I needed an onion (a perennial can’t-kill-it variety). Onion in hand, I’d sigh deeply and return to my kitchen.
 The class booklet by Joel Karsten
But it’s spring and once again, anything is possible! And this year, I stumbled across new hope: a class on straw bale gardening that has seriously rekindled my hopes of achieving my ideal garden. The 3-hour class was offered by Rushford Community Education and presented by Joel Karsten, U of MN graduate with a BS in Horticulture Science and champion of the bale gardening method. It turned out to be a jam-packed, 3 hour race through the step-by-step how-to process on setting up a garden built to solve or prevent just about every problem that spoils the gardening experience.
I’ll first attempt to share what I learned about the most timely part of the process, setting up the garden. Since my straw bales are not quite ready to plant, I’ll start with the set-up and bale “conditioning” I’ve accomplished so far and follow up with another report after planting.
PART 1 – SETTING UP THE STRAW BALE GARDEN
Locating and transporting straw bales is the first challenge. In class Joel mentioned that he’d presented his straw bale garden class the previous weekend to an audience of 1100 gardeners in Fergus Falls. Within minutes of the end of his presentation there wasn’t a straw bale unspoken for in NW corner of the state. Taking that cautionary cue, I went straight from his class to searching Craigslist – my source of choice for finding straw and other ag products and services. I found straw for sale in Wykoff, MN just a half hour away and only $2 a bale. I made calls, got directions and hightailed it to an old barn filled with old straw that the new owner wanted to be rid of in order to rehab the building.
Straw bale gardening is a perfect use for old straw, according to Joel, as long as the strings are intact and not rotted. Tunneling rodents and raccoons had damaged many of the bale strings we hefted from high loft, to low loft, so we did a lot of digging through loose straw that was incredibly dusty and filled with any manner of unknown extras, to find enough solid bales. I consider the "extras" as supplying the bales with built-in composted fertilizer.
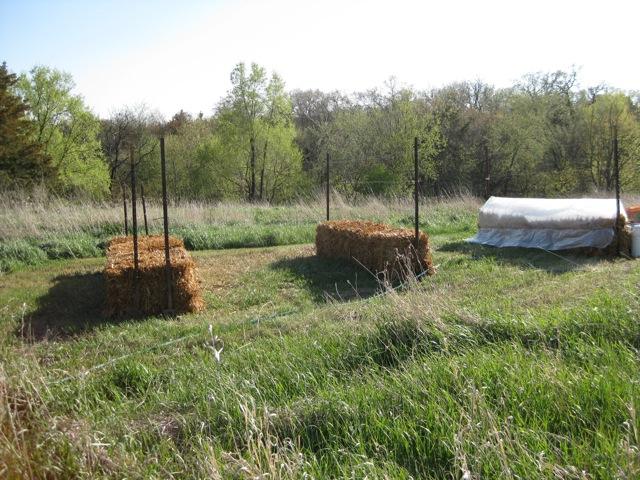
 Straw bale set upOnce home with the load of bales, I placed half of them in rows. (Storing the rest to minimize the work of getting new bales for next spring.) My set-up included two rows of 4 bales each with a 6-foot metal stake at each end that pins the bales in place. Rows are a little over six feet apart, to easily accommodate our lawnmower. Bales are cut-side-up, folded side down with the strings around the edges to maximize the straw’s moisture-holding capacity. I am also trying one double row to see if side-by-side bales might conserve more of the internal heat. (See photo of set-up.)
As a precaution, I looped electric fence wire tightly around each grouping of bales to hold them in place in case the strings give out mid-summer. Between end stakes, I used more fence wire to create an espalier rigging – double strands 10 inches up and 20 inches up, which I will thread growing plants between or tie them to the wire to offer support. Then, two more single wires strung at 30 and 40 inches up. Slip a sheet of plastic through the lower double wires and you can easily cover plants on a cold night, securing the plastic under the wire that I added around the bales. Next morning, sweep it like a shower curtain to one end, effectively creating a cozy low-tunnel thermal boost.
Next, stake a soaker hose in place. Face down on the bales, this plus a timer can make the job of watering a no-brainer. I snaked a 50-footer up and down each row, staked with landscape fabric pins, and duct-taped the sections that will be buried under the sod between rows to keep the lawnmower from undoing this no-fuss watering system. Plug impatiens plants (a standard flowering annual) into your bale garden and you’ll be able to see from the porch whether the bales need a drink, as impatiens wilt easily and noticeably act as a cue that plants are thirsty.
Conditioning the bales for fertile growing.
This garden is literally planted in straw bales that have been fertilized, watered and conditioned to create a prime vegetable growing medium. A little like solid hydroponics. Thanks to surface tension inside each shaft of grassy stalk, with bales oriented cut-side-up the straw holds roughly twice the original weight of the bale in water and maintains the moisture until the plant’s roots need a drink. According to Joel, once the bale is fully saturated, extra water sheds off, achieving optimal moisture levels for plant growth.
The conditioning process, which takes two weeks (two and a half for organic), jumpstarts the decomposition process and microbial development. The process is simple. Water the bales daily, either by hand or via the soaker hose. Add ½ cup fertilizer per bale every other day for the first week (see the straw bale garden website <http://strawbalegardens.com/> for week two of the particulars on fertilizing). Straight, low-cost lawn fertilizer was recommended, but synthetic nitrogen seems like a compromise. I’ve opted for an agricultural 20-value organic nitrogen spiked with a biological inoculant to stimulate microbial reproduction, plus ¼ cup agricultural molasses to feed soil microbes. This process gets the straw “cooking” (per Joel, up to 145 degrees inside the bale) as the breakdown of the straw gets underway. This process also produces nutrients that are banked and which will later feed garden plants. Once the initial heat of decomposition tapers off and the interior of the bale cools to 105 degrees, the garden is ready to plant.
Weeds and Pests
Since straw bales contain few seeds that are likely to germinate, weeds should be no big chore. Joel recommended using vinegar and a paint roller to kill unwanted plants without chemical pesticides. Since the bales are up off the ground, fewer insects are likely to bother your plants and exposure to the breeze makes plants sturdy and keeps their leaves dry and clean, preventing disease such as tomato blight. These benefits were music to my low-maintenance ears. We shall see how midsummer pans out.
Our farm is at the end of a dead end road, in the oxbow of the Root River. It’s the perfect sanctuary for hungry wildlife of all kinds. No problem, according to Joel, who suggests guarding the perimeter with motion-sensitive sprinkler heads that squirt anything that moves. Most animals quickly learn to stay away. To discourage birds, a product called Irri-Tape is mysteriously effective, according to Joel. So I have these two protection tools on order.
PART 2, PLANTING THE GARDEN
The conditioning period should be timed to finish approximately after the danger of last frost – about May first in southern Minnesota. As I write this, my bales are still conditioning. So I’ll sign off and continue with PART 2 in a future writing.
So far, this curious approach to growing good food has been a fun experiment. My plan is to watch, learn and enjoy whatever the harvest yields. I look forward to planting my straw bales around May Day, and sometime thereafter will report on the progress of this new approach to my ideal garden. Please watch for another installment.
Click here to go to Part 2 of this article.
 Kitty Baker grew up on a mixed ag farm, then in a small town, near Rochester, MN. She and husband Keith raised two daughters, living in Kansas City and Minneapolis. A professional writer, Kitty enjoys topics of lifestyle and food, especially since 1999, when they bought a farm, Root River Wilds, just north of Lanesboro, MN. The farm’s spectacularly varied acreage -- bluffs and woods, pastures and restored prairies cut with trails and wrapped in the oxbow of the North Branch of the Root River -- is rich with opportunities to discover and share ways to live abundantly. Her last article for SGT was: Volunteers keep cropping up.


