
Now that I’ve provided an overview of Minnesota State Community and Technical College’s Culinary Arts program and also what I learned in my first few wine classes, I’m moving on to our Poultry and Seafood class. Spring break is quickly approaching and will mark the end of our poultry unit and our transition into seafood.
We kicked off our poultry unit in the classroom, where we learned some textbook basics. First things first, we learned how poultry was categorized. All poultry must be inspected for “wholesomeness” by the USDA, which stamps the carcass and approves it for human consumption. The grading process is voluntary and funded by the meat processors themselves, while the USDA inspection is publicly funded (you can learn more on the US Department of Agriculture’s Food Safety and Inspection Service website). Food services utilizes Grade A poultry, while grades B and C are used in processed products. A poultry carcass’s grade can depend on such criteria as the presence of bruising, broken bones, or pinfeathers. After one failed pop quiz, my mnemonic for Kind (species), Class (age or sex), Style (cleansing and processing), and State of Refrigeration will be forever burned into the back of my mind: Keep Calm Double S. For some reason, I was also never able to properly regurgitate the make-up of poultry on the following quizzes and tests. For the record, it’s 75% water, 20% protein, and 5% fat.
This semester, our instructor has stepped up her game, making quizzes and tests much harder than our Introduction to Culinary Arts class. I cruised through last semester, acing tests only with the knowledge accumulated from reading books and watching the Food Network. After receiving a big, fat F on a poultry quiz, I hit the books. I memorized different types of poultry, from chickens to ratites, and how their sizes relate to each other. I memorized the main ways to keep poultry moist during cooking (basting with fat, barding, cooking dark and light meat separately, cooking breast-side down, and brining), and how to check the doneness of small birds. I reviewed reasons why it’s better to cook stuffing separately from a bird, why it’s ok to stuff small birds but not large ones, and how not to cook stuffing. For example, adding hot liquid to bread disintegrates the bread to mush. Together, we reviewed iconic chicken dishes and tips for properly roasting, grilling, and broiling poultry, plus which methods work best for each kind of bird.
 But book learning can only
get one so far in cooking. We have plenty of opportunities to practice what we
learned in morning food preparation labs and, most especially, in the butchery
lab. My passage into this lab will occur after spring break. In the meantime,
our teacher walked us through some poultry butchering demonstrations in the
kitchen. One afternoon, we convened around the butcher tables to learn about
how to break down a chicken. The chicken carcasses were packed in bags and we
had to fish them out from the liquid, and even the most faint of heart had to
quell their squeamishness and confront the chicken carcasses tossed at them
from across the table. With our instructor in the lead, we slowly walked
through the process of butchering a chicken into eight pieces.
But book learning can only
get one so far in cooking. We have plenty of opportunities to practice what we
learned in morning food preparation labs and, most especially, in the butchery
lab. My passage into this lab will occur after spring break. In the meantime,
our teacher walked us through some poultry butchering demonstrations in the
kitchen. One afternoon, we convened around the butcher tables to learn about
how to break down a chicken. The chicken carcasses were packed in bags and we
had to fish them out from the liquid, and even the most faint of heart had to
quell their squeamishness and confront the chicken carcasses tossed at them
from across the table. With our instructor in the lead, we slowly walked
through the process of butchering a chicken into eight pieces.
Prior to culinary school, I had basically no experience breaking down birds; my only attempt was only a recent, unsuccessful try that occurred shortly after moving to Fargo. I had visited an Asian market in search of ingredients to make a massaman curry, where the lovely proprietor led me around providing cooking instructions and choosing ingredients. She also talked me into purchasing a whole, frozen chicken. I assumed that I could break it down with relative ease, drawing from what I’d seen on food television. I have never been more wrong. The chicken was still partially frozen, my knives were cheap and dull, and I splattered myself in chicken juice. I literally and figuratively butchered the chicken and it looked nothing like the eight piece-pack I usually buy at the grocery store. It never became tender after cooking and the whole effort was a bust. This past week, I watched participants on the television show Worst Cooks in America struggle with breaking down chickens after only watching a demonstration and I felt a great deal of empathy.
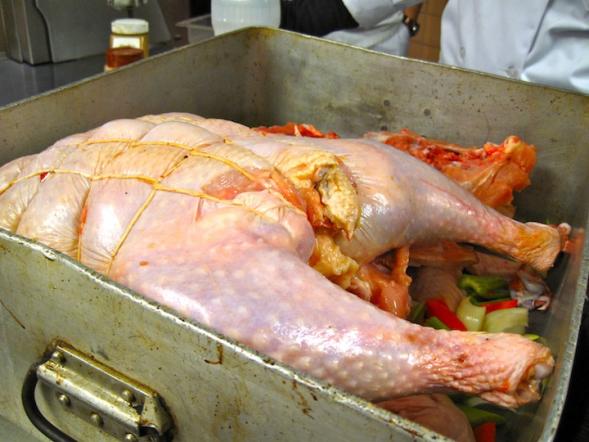
In class, I mis-stepped somewhere around my second cut along the left side of the spine. All was not lost and my broken-down bird was salvageable enough to throw into the pile we’d bake and serve later that week. I can’t imagine I will successfully break down a chicken until butcher lab, where I will get to practice with many birds instead of one. Later, we took turns learning how to break down turkeys, which turned out to be basically the same process on a larger scale. Before we packed away our knives and sanitized the cutting boards, we placed the turkeys in roasting pans on top of roughly chopped vegetables. We rubbed them with butter and seasonings and roasted them overnight for lunch the next afternoon. The drippings were incorporated into gravy and the carcasses were used to make stock for soups.
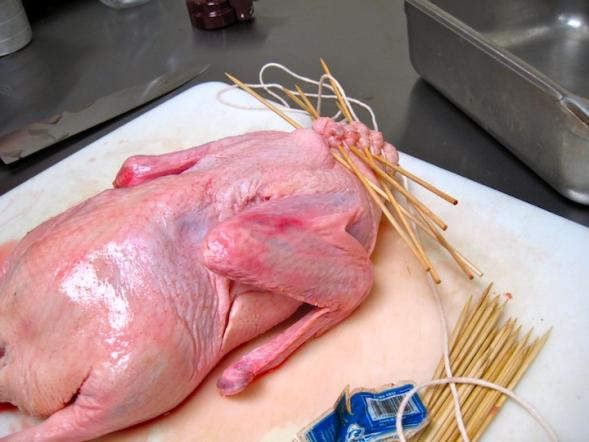
The grand finale of our poultry unit involved Peking ducks. We were debriefed on the process and shown an episode of Jeff Smith’s show, The Frugal Gourmet (Part I and Part II available on Youtube). On the first day, we divided into pairs. One individual made the marinade while the other prepped the duck for surgery. It was sprinkled with salt and the rear was tucked in and tightly stitched. We secured the duck’s seam with a series of wooden skewers and wove wet twine to secure the opening. I gently poured in a marinade made from quickly reducing orange peel, green onion, hoisin, soy sauce, and garlic. Then, we repeated the same process with wooden skewers and twine to close the neck end and seal in the marinade.
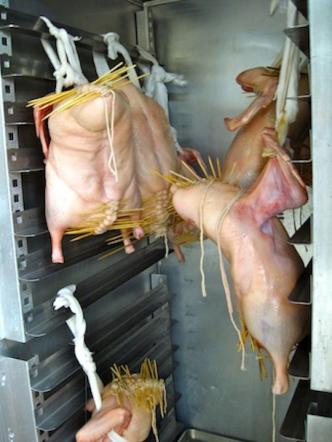 Our instructor helped us
separate the skin from the flesh with an air compressor. We cradled our puffy
bird in cheesecloth and bathed it in what we refer to as a “trunnion.” It’s
also called an electric braising pan with a tilted skillet and you can find an
example here. filled
with hot water and honey. Using the cheesecloth, I gently rocked the bird back
and forth so the hot water could flavor the skin and render some of the excess
fat. I dropped the bird into the water and scorched myself in the process. “Bird
down!” I shouted as a classmate fished it out with a wok. We hung the birds in
an empty refrigerator lined with a sheet pan to dry and cool. Two days later,
our instructor cooked the birds on racks set inside roasting pans and, by the
time our class convened, the skin was crispy and meat was succulent.
Our instructor helped us
separate the skin from the flesh with an air compressor. We cradled our puffy
bird in cheesecloth and bathed it in what we refer to as a “trunnion.” It’s
also called an electric braising pan with a tilted skillet and you can find an
example here. filled
with hot water and honey. Using the cheesecloth, I gently rocked the bird back
and forth so the hot water could flavor the skin and render some of the excess
fat. I dropped the bird into the water and scorched myself in the process. “Bird
down!” I shouted as a classmate fished it out with a wok. We hung the birds in
an empty refrigerator lined with a sheet pan to dry and cool. Two days later,
our instructor cooked the birds on racks set inside roasting pans and, by the
time our class convened, the skin was crispy and meat was succulent.
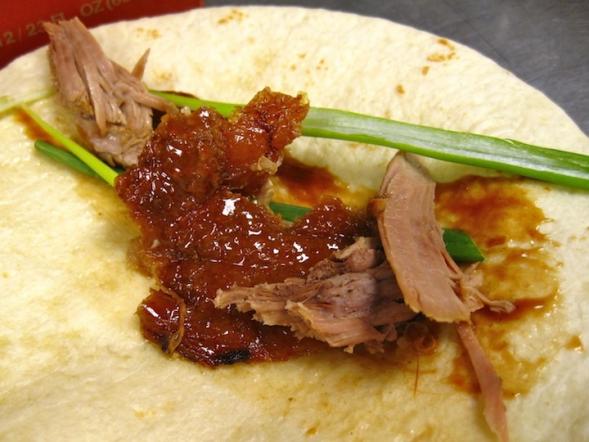
The first and only time I had eaten Peking duck before was during my senior year of college in a restaurant in Seattle’s International district. Like my other dining companions, I was surprised to see more skin served than meat. Six years later, my perspective has changed. I looked forward to consuming the crispy skin more so than the meat. I smiled and exchanged glances with the only other student sneaking pieces of crispy skin from the cutting board. In Seattle, we wrapped the duck and scallion strands in puffy, steamed buns spread with hoisin sauce. In Moorhead, MN, we made makeshift pancakes with steamed flour tortillas brushed with toasted sesame oil and hoisin sauce. Now, keep in mind that this home-method may not produce duck skin as shatteringly crisp as what you might find in a restaurant in an actual Asian community of a larger metropolitan area, but it still about as crisp as one can hope to achieve at home. At the end of class, I was one of a lucky few who bought the extra Peking ducks to take home.
To adapt this method more easily for home cooking, you can use a bicycle pump to separate the skin from the flesh instead of an air compressor. If it is not possible to hang the duck in your refrigerator, my instructor recommends just letting it sit in your fridge, uncovered, for a day to dry out the skin.
Peking Duck
Adapted from Colleen Kraft’s adaption of Jeff Smith’s recipe from the television show The Frugal Gourmet
 Using an air compressor to pump air between the duck skin and meatIngredients:
Wooden skewers or needles (long skewers can be broken in half)
Butchers twine (wet twine will slide easier and form tighter knots)
Salt, enough to sprinkle over the exterior of the duck
Duck Marinade
1-2 Tablespoons vegetable oil (not olive oil)
Peel from ½ orange, roughly peeled with a paring knife
1-2 cloves garlic, minced
2 green onions, roughly chopped
½ teaspoon salt
2 teaspoons brown sugar
½ cup hoisin sauce
2 Tablespoons soy sauce
1/3 cup chicken stock
Optional: Fermented soybean jam/condiment
Honey Water:
6 quarts water
6 Tablespoons honey
Instructions:

Jeni Hill grew up in the Twin Cities and recently moved to Fargo. Her two sustaining passions are food and writing and she combines the two whenever she gets the chance. Jeni believes food is never just about the food and considers it the finest medium to connect with others. When she is not crafting contributions to Simple Good & Tasty, she may be posting to her blog An Herbalist Eats, 20food, or Fargo's High Plains Reader. Her last series for SGT was Farm to Fork, a CSA Series.