This is the seventh article in a series about attending Culinary School. Also check out posts on Seafood Class, Menu Planning, Cooking in Quantity, Poultry Class, Wine Tasting Class, and the Introduction to the series.
Our wine class instructor is a true Jack-of-all-trades. In the past, he’s managed kitchens and worked for food companies; he also cures meats, crafts sausages, taps maple syrup, creates elaborate ice carvings, roasts coffee, forages for morels, and makes his own wine. Fortunately, for us, he brings these eclectic experiences to our culinary school table by sharing what he’s learned over the years and giving us tastes of his latest projects. During the second half of our wine course, he shared his winemaking knowledge by helping us make and bottle our own batch of wine that were able to purchase and take home on the last day of class. Last Thursday evening,I must have been quite the sight as I navigated my way through a crowd of prospective students, awkwardly cradling two bottles of wine under my arm. At least they could see our culinary program included hands-on learning.
As I mentioned in my first wine class update, I haven’t taken the same shine to wine as I have to food. Learning about wine just seems drier (no pun intended).A couple months ago, before we began making our own wine, we learned about the basic winemaking process and I struggled to remain focused. There seemed to be so many steps, substances, and variables. The lecture reminded me of high school chemistry class, and I’m sure you can imagine how well I did in that subject. However, the topic of winemaking really came to life when our teacher walked us through making a batch as a class. This hands-on experience clarified the process and appealed to my left-brained sensibilities. Plus, it was a lot of fun.
Usually, my teacher crafts wine from the grapes grown on his property or from juice obtained from friends and local vineyards, but for the purposes of our winemaking class, he bought a Chardonnay wine kit from Country Cannery in Moorhead, MN. This boxed kit only cost $66 and made 30 bottles of wine. It included Chardonnay juice concentrate and additives such as toasted wood powder, yeast, clarifiers and preservatives in pre-measured pouches, all accompanied by step-by-step instructions. Those who live in Fargo-Moorhead can also seek winemaking resources from Uncorked, whose staff provides customized assistance and access to their winemaking equipment. However, prices for their assistance making the same amount of wine we made in class starts around $200.
In addition to the wine making process, itself, I found the winemaking equipment intimidating because it was unlike anything I’ve ever used in any kitchen. The kits are fine for an introduction to winemaking, but if you want to continue producing your own wine, you would be better off investing in your own equipment. This equipment can be bought at home brewery stores or online, though our teacher mentioned one might also find it used (and cheaper) at garage or estate sales. Purchasing a boxed kit may be the easiest option for those who are new to winemaking, but you can also use your own juice. However, first timers may find it helpful to consult with a winemaking shop or conduct his or her own research to select the types and measurements of yeast, stablizers and clarifyers that will work well with the grape. See what I mean by chemistry?
To begin our winemaking, we first unpacked the wine kit. Step one instructed us to add four liters of warm water to the “primary fermenter,” a sanitized, food-grade plastic container equipped with a spigot and lid with a bunghole. I was surprised to learn that t he words “bung” and “bunghole” are real wine terms. Rest assured, they aren’t just my attempt at making crude jokes, though I found the terms endlessly giggle-inducing to the delight/dismay of everyone around me. I noticed that Mike Rowe did, too, during his winemaking episode on Dirty Jobs that we viewed in class. Every time someone mentioned “bunghole,” including him, he broke down into laughter, which made me feel better about myself.
 Pouring the bagged juice concentrate into the primary fermenter bucket.
We then mixed the warm water with bentonite, volcanic clay that helps clarify the wine. Then we added the bag of juice concentrate and more water, and then tested the mixture with a hydrometer, a tool that indicates the wine’s “gravity.” This number indicates where the wine is in its fermentation process, as well as its potential alcohol percentage. The kit’s instructions told us to aim for 10-12 percent, so when we found our number was too low, we added sugar. The yeast would eventually consume this extra sugar and produce a larger amount of alcohol. After we added the toasted oak powder for flavor, we sprinkled the yeast into the bucket, secured the bucket’s lid, and plugged the bunghole with an airlock that allowed the fermenting wine to release carbon dioxide. The bucket sat in our storage room and throughout the next few weeks, we would peek curiously at the bubbling inside the airlock of the carbon dioxide as it was released.
 The racked wine. The debris on the bottom is the lees - particles and yeast cells.
Two weeks later, we determined the wine was ready to be racked, a process in which the wine is transferred to a new container and allowed to continue to ferment. We began the racking process by siphoning the wine from its original bucket into a large glass jar, leaving behind any sediment. We added sulphite and potassium sorbate to stabilize the wine and prevent the yeast from continuing to ferment. If this stabilizing step isn’t properly handled, the alcohol can continue to ferment after the wine has been bottled and cause a messy explosion (too much carbon dioxide will build up in the sealed bottle, causing the bottle to explode). After we stirred these substances into the wine vigorously for 15 minutes, we added two more clarifying agents, kieselsol and then chitosan. As we racked and clarified the wine, the dead yeast and other sediment known as the “lees” gathered on the bottom of the jar. Some wines such as Chardonnay and Champagne are aged “on the lees” for a longer period of time than other wines to absorb the yeasty flavor of the lees. At this point, we tasted the wine and found it sour and yeasty. We completed the racking process by adding enough water to bring the wine closer to the neck of the jar and inserting the bung and airlock.
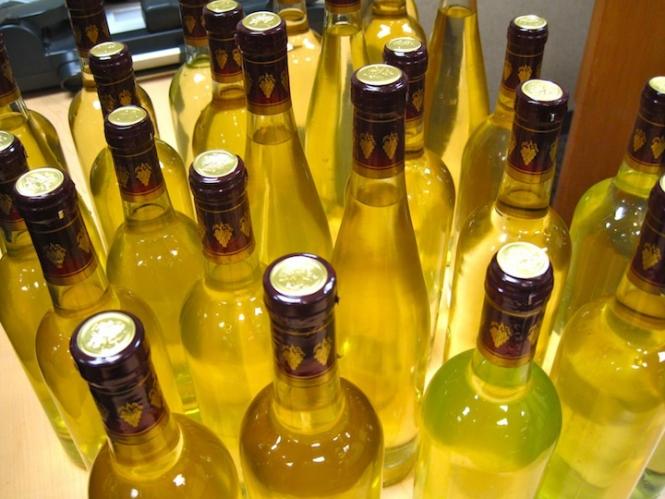
On the last day of class, we bottled the wine. New wine bottles cost between one-two dollars each, so our teacher provided previously used wine bottles which he sanitized. We transformed into an assembly line and rotated through the bottling stations.
 The bottle tree.At the first station, we
sanitized the bottles with a bottle tree. The top is filled with a solution
made from water and a very small amount of potassium metabisulphite. When we
placed the bottle on top of the tree and pressed down, and it rinsed the inside
of the bottle. Then, we hung the sanitized bottles on the tree to drain.
The bottle tree.At the first station, we
sanitized the bottles with a bottle tree. The top is filled with a solution
made from water and a very small amount of potassium metabisulphite. When we
placed the bottle on top of the tree and pressed down, and it rinsed the inside
of the bottle. Then, we hung the sanitized bottles on the tree to drain.
Next, we filled the sanitized bottles with a wine bottle-filling tool. When we tapped the bottom of the wand inside of the wine bottle, it siphoned wine from the big jar and filled the bottle to the correct height for corking. With a firm push, the corking machine’s lever stuffed the sanitized cork into the bottle, resulting in an airtight seal. Finally, we placed a plastic seal on the top of the bottle, turned it upside down, and gently submerged it in hot water for a couple seconds. The heat from the hot water created something like a vacuum seal that melted the plastic tightly around the corked end of the bottle.
After we wiped the bottles, they were ready, and we were invited to purchase them at cost for only $3.50 each. Some of my classmates enjoyed their wine that evening, though I found that it still tasted too tart. Our teacher recommended aging the Chardonnay no longer than a year, since white wines generally age less well thaneds. Our teacher didn’t explain the reasons why in much detail but internet research suggested this may be due to the fact that white wines lack tannins which help with the aging process and that Chardonneys, in particular don’t age well because they are higher in acidity. I took two bottles home, and I plan to enjoy one in a few months and save the second for next spring.
Taking home wine we made ourselves was the highlight of our winemaking class, but since my last update, I also enjoyed learning these facts about wine:
Wine, In General
- Even red grapes produce white wine. It’s the red skins that lend a rosy hue, not the juice. The wine skins also add tannins, which create the sensation that makes your mouth feel dry. You can feel the effect of tannins by peeling the skin off a grape and eating it.
- There are many types of corks. Natural cork comes from the bark of the Mediterranean oak tree and is harvested every nine years. Corks are also made from the dust and scraps that result from creating corks from whole pieces of bark. Synthetic corks are made from plastic and/or foam. Of course, there are screw tops, now, as well.
- Party trick: Our teacher demonstrated that it’s possible to remove a cork from inside a wine bottle in less than five minutes (if, say, you had a mishap and the cork fell into the wine bottle). Simply, twist the bottom of a plastic bag so that it fits into the wine bottle. Blow into the open end so that it partially inflates inside the bottle. Yank the bag from the bottle and the cork should fly out as well.
That Bubbly Stuff
- Champagne isn’t a general term for sparkling wine. Anything labeled “Champagne” has to come from Champagne, France, where it has been aged in caves. Champanois is sparkling wine made similar to the Champagne method, only somewhere else. The cheaper versions of bubbly are made by the Charmat method, which is less time consuming. Our teacher compared it to a soda stream machine.
- Sparkling wines go from very dry to very sweet in this order: Extra Brut, Brut, Extra Dry, Sec, Demi Sec, and Doux/Dolce. I wish I had known this on New Year’s Eve.
- The wire that secures the cork on a bottle of sparkling wine is twisted six times.
 Some of the sherries we sampled.
Fortified Wines (Sherry, Vermouth, Sherry, Port, etc.)
- These wines were created out of necessity. The addition of extra alcohol preserved the wine during its long voyages overseas.
- Grappa, an Italian fortified wine, is made from distilling the seeds and grape skins that were used to make wine. We tasted an 84 proof variety that went down like fire, but its aftertaste was surprisingly lovely and fruity.
- Vintage port tastes best for up to four days after opening. The older the vintage port, the shorter its shelf life.
Etc.
- Don’t buy the Chianti in the wicker baskets. We were advised that it’s a gimmick.
- The film Sideways, released in 2004 brought Pinot Noir into the spotlight and it’s still expensive. Jon Thorsen, a Twin Cities blogger who writes the unpretentious The Reverse Wine Snob, has a few recommendations for bottles under $20.
And in Conclusion. . .
It’s unlikely I’ll study wine in this
much depth again, but I have no regrets about taking this Introduction to Wine
course. My main goal was to become wine literate, and, although we barely
scratched the surface, I now have a basic understanding of wine tasting and terminology.
I’m most excited about my newfound wine literacy for the personal reason that I
now have better grasp of what kinds of wine I like and why. Since we tried
several versions of the most common varieties of wines, I can make an educated
selection at a restaurant or in a liquor store and choose a bottle that I’m
more likely to enjoy. From time to time, I’ll embark on the adventure of
randomly choosing a wine and allowing the wine gods to decide my fate, but it’s
convenient to know that I don’t like heavily oaked Chardonnay or red wine with
a high alcohol content. In contrast, I also learned that I do like the floral
notes of Chenin Blanc and gravitate towards Gewürztraminer.
After we bottled our wine, we gathered around the table to sample varieties that we hadn’t covered earlier in the course. We sipped $26 port, cloyingly sweet Claret, and Valpolicella Ripasso and enjoyed them all with frozen pizzas left in our cooler. We parted with this moment that illustrates my favorite way to enjoy wine; in the company of others over whatever food is available. The world of wine is often portrayed as pretentious and unapproachable, and it can seem intimidating with its unfamiliar terminology and equipment. However, wine can also be a lot of fun and ultimately comes down to one’s personal preferences. There’s no shame in drinking what you like and drinking what you can afford. Even the cheapest of bottles tastes magnificent in the company of friends.
Jeni Hill grew up in the Twin Cities and recently moved to Fargo. Her two sustaining passions are food and writing and she combines the two whenever she gets the chance. Jeni believes food is never just about the food and considers it the finest medium to connect with others. When she is not crafting contributions to Simple Good & Tasty, she may be posting to her blog An Herbalist Eats, 20food, or Fargo's High Plains Reader. Her last series for SGT was Farm to Fork, a CSA Series.