 When it comes to making and preparing food, you can’t get much more local than homemade. When your food is prepared, cooked, and served all in the same factory – a home kitchen – there is a sense of ownership over the food. It’s not just the sense of accomplishment, but also because it is so much easier to know your ingredients. There are tons of prepared, cured, and processed foods on the shelves of grocery stores that used to be made at home - they’d be much better tasting (and better for us) if they still were. It may seem like a lot of effort to make your own ketchup, jam, cake, or bacon; but it doesn’t need to be. Bacon is one of those foods that is processed to death in grocery stores and is so delicious homemade. I recently cured and smoked my own bacon and had a great time doing so. Read on and see how little effort it actually takes to make some tasty bacon. Bacon begins with pork belly. This cut is fatty and flavorful. Since it really is the belly (unlike the confusingly named pork shoulder and butt), you might find it with the skin on. There are a lot of good local producers to get your belly from; check the SGT Directory to find one. You’ll probably find pork belly in 1-3 lb. portions, and that’s a good size to cure. To get the belly ready to cure, make sure the pork is really fresh and any skin is off. REMEMBER: Through this whole process, the meat is raw. Curing and smoking will prevent spoilage, but you must be careful to avoid contaminating your kitchen with raw pork. First comes the curing. Curing meat entails drawing the liquids out of it with salt so bacteria don’t have as much of a chance to grow. To counteract the harshness of a lot of salt in the meat, you can add a variety of sweet flavors – any type of sugar, maple syrup, or preserves (I want to try blackberry preserves, but haven’t yet). The proportion of salt to sweet is somewhat arbitrary, but I suggest 1:1. After a few batches, you will be able to fine-tune the cure to your liking.
 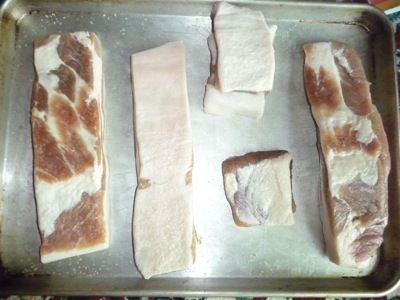 To start the curing process, cover your pork bellies with the curing mixture. To keep the bacon from being too salty, add 1 tablespoon of salt (plus any sweet addition) to 5 lbs. of meat. Make sure the cure is on all surfaces of the meat and rubbed in well. The salt will bring out a fair amount of liquid from the meat, so wrap it with plastic wrap and keep it on a baking sheet or shallow pan. During the curing process you’ll still need to refrigerate the meat, so store it in your fridge. Reapply a similar amount of cure every day or so, wiping or quickly rinsing and drying the slabs to remove the previous cure. The whole curing process can last from 3-5 days, depending on how moist your meat is to begin with. The meat is done curing when it becomes firm and a deeper red in color. See the bottom of the article for some variations on curing. Technically, you could be done with your bacon at this point. You’ve cured it, so it is preserved and salty. But what’s bacon without being smoked? Besides adding flavor, smoking dries the meat further and has antimicrobial properties. The bacon should stay raw through the smoking, so I like to do a cold smoke – meaning that the temperature around the meat should not rise above about 90 degrees. To keep the temperature down, the source of heat should be separated from the meat.

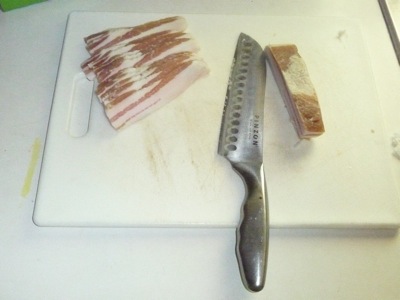
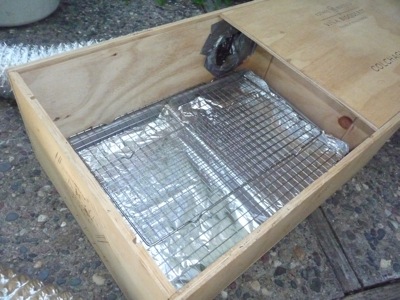 Looking at the set-up I made, you see that I have a low fire of hardwood charcoal and wood chips in a grill. Use hardwood charcoal and not briquettes, or you’ll taste the briquettes’ glue in your bacon. The type of wood chips is up to you, but I prefer apple, cherry, or walnut. Hickory and mesquite have too many strong artificial flavors for me. I captured the smoke from the fire with a dryer duct (from the hardware store) that delivered it to a box with the meat in it. The duct I have is 25 ft long and by the time the smoke gets to the meat, it is about 85 degrees. This whole set up is very DIY, so another effective configuration could look very different. You can smoke for different lengths of time for a more or less smoky flavor, but the bacon should be smoked for at least a good 2 hours. The meat will be an even deeper red now. Your pork belly is now bacon! Now comes the slicing. Unless you have easy access to a big meat slicer, you’ll have to do it by hand (and it will be thick-cut). Beforehand, put the bacon in the freezer for about half an hour to make it easier to slice more thinly. Slice it with a back and forth motion using a big, heavy chef’s knife.
I hope you enjoy your bacon! Whether you bake it or fry it, homemade bacon is meaty and delicious. If yours, like some of mine, is too salty, you can soak the slices in water for a little bit before cooking. Just make sure to dry the surface off before cooking. Your final product is great as part of a hearty breakfast, good BLT, or wrap for a tenderloin. Now a few notes on curing. Most store-bought bacon has nitrites (salt peter) in it. It helps preserve the meat but is also in fireworks, so I avoid eating it. You can add it to your cure if you prefer, but it’s not necessary. Another way to go about curing is to soak the pork belly in a brine for several days. Add ½ cup each of salt and your sweet addition per gallon of water. Make sure there is enough liquid to fully cover the meat and put it in a sealed bag in the fridge.
This post was written by Alex Christensen. You can read his bio here, follow him on Twitter, or join the soon-to-be-formed Alex Christensen fan club.


